
Adding Automatic Placement Calculation Points
The Calculation Points - Automatic Placement (AP) command allows you to quickly place calculation points on any room or object surface (and work planes inside Rooms). You specify which surfaces will have calculation grids placed on them in the Calculation Points - Automatic Placement dialog. As with other calculation types, the calculation grids may have numeric analysis and labeling options associated with them, in addition to appropriate point spacing.
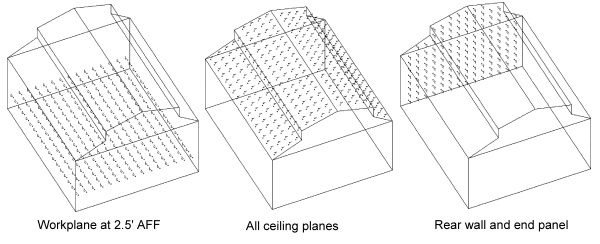
When calculation points are placed on certain roofs, ceilings and object tops (such as dome, vertical extrusion, pyramid, etc.) an individual calculation grid or polygon is created for each section in addition to a composite grid for the entire ceiling or object top. The composite grid will summarize the values for all associated sections.
When editing Automatic Placement grids, the surfaces that include points are automatically tagged when the AP dialog is opened. This allows you to make changes to all points without having to first navigate to the surfaces containing points.
- From the Add
menu choose Calculations - Automatic Placement,
or in the Calculations Toolkit select
 .
. - Select the room or object that you wish to place one or more grids on by locating the pick box cursor on a boundary line and clicking the left mouse button.
- In the Automatic Placement dialog, you may use the Display Options button below the image to change its appearance, such as showing it as outlines only or filled in, and changing the background color. You may use the interactive navigation buttons to view the object from different angles. (Additional information below)
- Use the navigate at the top-left in the dialog to change the highlight to the surface or group of surfaces to which calculation points will be added. Tagging surfaces allows you to quickly select multiple surfaces based on inherent relationships in AGi32 entities. Calculation options will be applied in the same way to all tagged surfaces. See table below for a description of the navigation buttons and their functions.
- To apply calculation points to all selected surfaces, select the On option in the Calculation Points row in the Calculation Points section. A preview of the calculation point spacing and locations will be shown in the graphics display.
- You may change the point spacing in either or both directions in the General section. Tip: If you type a value for PtSpacingLR and press Enter, that value is automatically entered for PtSpacingTB. This value may be changed as needed.
- Change the Calculation Type, if desired. (See below.) The default is Illuminance.
- If desired, specify Highlight Values by clicking on the Highlight
Values button
 on the top menubar.
 - If desired, specify Isolines by clicking on the Isolines button
 on the top menubar.
 - Click OK. The calculation grids will automatically be created according to your specifications.
Navigation, Tag and View Control Icons
|
Icon |
Command |
Keyboard Shortcut |
Comments |
|---|---|---|---|
|
|
Move to Previous Surface |
F9 |
Navigates to previous surface in selected room or object; Workplane is assigned as last surface in Rooms. |
|
|
Move to Next Surface |
F10 |
Navigates to next surface in selected room or object; Workplane is assigned as last surface in Rooms. |
|
|
Move to Workplane |
F6 |
Navigates to work plane surface in selected room. This icon only appears when a room is selected. |
|
|
Move to Previous Component |
F11 |
Navigates to the first surface in the previous component in the selected object. Objects only contain multiple components if they are composed of grouped objects (Library Objects) or multiple layers (imported 3D Objects). To navigate within the surfaces of a component, use the Move to Next/Previous Surface commands. |
|
|
Move to Next Component |
F12 |
Navigates to the first surface in the next component in the selected object. Objects only contain multiple components if they are composed of grouped objects (Library Objects) or multiple layers (imported 3D Objects). To navigate within the surfaces of a component, use the Move to Next/Previous Surface commands. |
|
|
Tag Current Surface |
F8 |
Selects the current surface for calculation point placement. Surfaces only need to be tagged if you want to apply calculation points or make modifications to more than one surface. |
|
|
Tag Ceiling, Top or Roof |
Ctrl+E |
Selects all surfaces that were created as ceilings (in Rooms) or tops (in Objects) for calculation point placement. Surfaces only need to be tagged if you want to apply calculation points or make modifications to more than one surface. |
|
|
Tag Walls or Sides |
Ctrl+W |
Selects all surfaces that were created as walls (in Rooms), or sides (in Objects) for calculation point placement. Surfaces only need to be tagged if you want to apply calculation points or make modifications to more than one surface. |
|
|
Tag Floor or Bottom |
Ctrl+F |
Selects all surfaces that were created as floors (in Rooms), or bottoms (in Objects) for calculation point placement. Surfaces only need to be tagged if you want to apply calculation points or make modifications to more than one surface. |
|
|
Tag Object Component |
Ctrl+O |
Selects all surfaces in the current Object component for calculation point placement. Surfaces only need to be tagged if you want to apply calculation points or make modifications to more than one surface. |
|
|
Tag All Surfaces |
Ctrl+A |
Selects all surfaces for calculation point placement. Surfaces only need to be tagged if you want to apply calculation points or make modifications to more than one surface. |
|
|
Remove All Tags |
Ctrl+R |
Deselects all selected surfaces. Necessary when you wish to apply alternate calculation point options to different surfaces. Note: Surfaces remain tagged, even when additional surfaces are tagged, until Tags are individually or collectively removed. |
|
|
Front View |
|
Displays a Front (South) Elevation View of Room or Object in graphic display. |
|
|
Back |
|
Displays a Back (North) Elevation View of Room or Object in graphic display. |
|
|
Left |
|
Displays a Left (West) Elevation View of Room or Object in graphic display. |
|
|
Right |
|
Displays a Right (East) Elevation View of Room or Object in graphic display. |
|
|
Top |
|
Displays a Top Plan View of Room or Object in graphic display. |
|
|
Bottom |
|
Displays a Bottom Plan View of Room or Object in graphic display. |
|
|
Clip | Cuts away the front plane of the image continuously to reveal the objects within and beyond. The size of the image does not increase or decrease. This command is very useful when viewing an image with exterior and interior components (e.g., interior and site lighting). | |
|
|
Dolly | Moves the observer and the focus point in and out of the model along a straight line. Depending on the view direction, from the observer’s point of view, this feature allows you to “walk” into and out of the space. | |
|
|
Orbit | Moves the observer around the model while maintaining the same focus point. Imagine that you are a spaceship orbiting the earth, always looking at the center of the earth. | |
|
|
Pan | Moves the observer and focus point relative to a fixed model position. Imagine that you are looking straight ahead and moving laterally left/right or up/down. The image will move opposite to the panning direction. | |
|
|
Rotate | Allows the observer to look left or right and up or down from a fixed position. Use this command when you are in a space and want to look at different surfaces without changing your position. A panorama view is obtained by moving constantly to the left or right. | |
|
|
Walk | Combines the Dolly, Pan and Rotate commands into one movement. Dragging the mouse up/down moves the observer forward and backward. Dragging the mouse left/right, rotates the observer view position left and right. Using the Shift and Ctrl keys in conjunction with dragging or the arrow keys invokes the Rotate and Pan commands as well. | |
|
|
Zoom | Similar to the Zoom In and Zoom Out commands in AGi32’s Model Mode, with the difference being that the image size is continuously increased or decreased as the mouse is held down and dragged. |


Clicking on the Display Options button below the image opens a list of ways that the image appearance may be modified. For example, you may select to keep outlines visible and surfaces filled in, but not show text or drawing entities associated with this Object or Room. These selections apply to the image seen in the Surface Edit dialog only. By default, all options are selected, with the background color available for modification.
Additional Dialog Options - in order of appearance in Automatic Placement dialog
Dialog Settings
This dialog section controls the display options for surfaces. This section is hidden by default.
Tag Surface Color - Indicates the line color of tagged surfaces. Default color is yellow; color may be changed by user.
Current Surface Color - Indicates the line color of current selected surface. Default color is cyan; color may be changed by user.
Removed Surface Color - Indicates the line color of removed surfaces. Default color is black; color may be changed by user.
Meter Vector Color - Indicates the line color of Normal Meter Vector. Default color is black; color may be changed by user.
Meter Vector Length - Indicates the Normal Vector length in current units - feet or meters. Meter Vector indicates the Normal side of selected surface by default (or Abnormal side, if this option is selected in the Calculation Points section). Vector Length is automatically calculated from 15% of maximum entity extents in X or Y (whichever is larger); may be changed by user.
Associated Entity
Entity Type - Indicates the type of Entity selected - Room or Object. Text box is only displayed for informational purposes; not changeable by user.
Entity Label - Indicates the Label of the selected Entity - originally assigned by user when entity was created. Text box is only displayed for informational purposes; not changeable in this dialog by user.
Component Label - Indicates the Label of the current component in selected Entity - originally assigned by user when entity was created. Component Label only contains information if an Object with Components is selected. Text box is only displayed for informational purposes; not changeable in this dialog by user
General (All Calculation Points)
This section controls global calculation point settings for this session. The same calculation point parameters are applied to all calculation grids in the same Family. If different point spacing is desired for different surfaces within the same entity, apply Automatic Placement multiple times to the same entity (with desired point spacing each time).
Family Label - Indicates label of associated calculation points. By default, Family Label defaults to associated Entity label. However, user can specify alternate name, if desired.
Description - Specify an optional description, up to 80 characters, for family of calculation points, if desired.
Point Spacing LR - Specify the left-to-right point spacing for all calculation grids. By default, a point spacing of 2 x 2 is used for rooms, 10 x 10 for objects. As the point spacing changes, the text size automatically adjusts.
Point Spacing TB - Specify the top-to-bottom point spacing for all calculation grids. By default, a point spacing of 2 x 2 is used for rooms, 10 x 10 for objects. As the point spacing changes, the text size automatically adjusts.
Text Size - Indicates the Text height, in current units (Feet or Meters) of the calculation point values. Text Size is automatically sized based on point spacing; may be changed by user.
Center Points on Surface - Indicates that calculation points within all selected grid boundaries are centered. This option is On by default.
Surfaces
This section provides information about the currently selected surface.
Number - Indicates the surface number of the currently selected surface.
Tag - Indicates if the surface is tagged or not. You may manually tag a surface by changing the Tag text box from Off to On.
Label - Indicates the Surface Label (Floor, Bottom, Walls, Sides, Ceiling, or Top) of the selected surface. Text box is only displayed for informational purposes; not changeable by user.
Workplane Height - If a room is selected, you will have the option to add a horizontal illuminance calculation polygon on the work plane. When the work plane surface is selected, you can specify the work plane height in this text box. Default value is 2.5 feet. You may change the work plane Height to 0 if desired. This has the effect of using the Virtual Meter for calculations instead of the Exitance meter.
Calculation Points
This section specifies the type of calculation metric used and light meter position.
Calculation Points - To enable calculation points on all selected and tagged surfaces, select On in the text box. Similarly, to remove calculation points from a surface, switch the Calculation Points Off. Tip: Double-clicking on the word On will change the selection to Off, and vice versa.
SubLabel - Indicates the Surface SubLabel (i.e. which wall or ceiling surface is selected).
Calculation Type - Indicates whether Illuminance, Exitance, Diffuse Luminance, or Daylight Factor is calculated. Default metric is Illuminance.
|
Calculation Type |
Comments |
|---|---|
|
Illuminance |
Light incident on the surface; lumens per sq.ft or lumens per sq.m |
|
Exitance |
Light reflected off the surface; lumens per sq.ft or lumens per sq.m |
|
Diffuse Luminance |
Density of luminous flux projected in a given direction off of the (assumed diffuse) surface; candelas per sq.m |
|
Ratio of interior daylight to exterior daylight on any surface or workplane |
|
| Photopic/Mesopic | When this option is selected, four grids are created: Photopic and Mesopic Illuminance, and Photopic and Mesopic Luminance. For purposes of calculations, Mesopic conditions occur when adaptation luminance is 5 cd/sq.m or less. Above this level, mesopic values are equal to photopic values. |
| PPFD | Photosynthetic Photon Flux Density, micromoles per second per square meter (μmol/s-m2) |
Notes:
- Exitance values are based on the Numerical Units chosen in System Settings, not on the Display Units. If the numerical units are footcandles, Exitance values will be displayed in Lumens/Sq.Ft. If the numerical units are Lux, Exitance values will be displayed in Lumens/Sq.Meter.
- Program calculates non-view-dependent diffuse luminance only (all surfaces are considered lambertian).
- Diffuse luminance is essentially Exitance/π and is always reported in cd/sq.meter.
- If PPFD is selected, the PPFDFactor field becomes editable. Once a PPFD Factor has been specified, the Description (from the PPFD Factors dialog), will be displayed in the PPFDFactorDesc line. This field is read-only, as it is extracted from the PPFD Factors dialog.
Points on Surface - Indicates which side of surface calculation points will be added to - Normal or Abnormal (back side). Default setting is Normal Side.
|
Entity Type |
Normal Side |
|---|---|
|
Room (Floor, Walls or Ceiling) |
Front - Interior (Inside); Top - Workplane |
|
Objects (Bottom, Sides to Top) |
Front - Exterior (Outside) unless Reflective Side is on Inside for certain objects (e.g., cone or round - vertical rotation). |
Light Meter Type - Indicates Position of Light Meter on Selected surfaces. Default position is Normal to Surface: Light meter is placed flush against surface, Normal is perpendicular to surface. More on light meter angles
|
Light Meter Type |
Comments |
|---|---|
|
Normal to Surface |
Light meter is placed flush on surface, Light meter Normal is perpendicular to surface (same as Surface Normal). Illuminance, Exitance, Diffuse Luminance, and Daylight Factor may be measured with this Light Meter Type. |
|
Fixed Orient/Tilt |
This Light Meter Type is used when user wishes to specify a fixed light meter position unrelated to surface direction and normals (e.g., measure horizontal Illuminance on sloped plane). User specifies Meter Orient and Tilt in text boxes below. Only Illuminance may be measured with this Light Meter Type. |
|
Variable - Aim Towards Point |
Indicates that all light meters will point toward one fixed point, specified with X, Y and Z input. User specifies Meter X, Y and Z Aiming Points in text boxes below. Only Illuminance may be measured with this Light Meter Type. |
Meter Orient - Indicates Meter Orientation for Fixed Light Meter Type. Orient angle is first angle applied.
Meter Tilt - Indicates Meter Tilt for Fixed Light Meter Type. Tilt angle is second angle applied.
Aim Meter Towards X - Indicates X Aiming Point for Variable Light Meter Type.
Aim Meter Towards Y - Indicates Y Aiming Point for Variable Light Meter Type.
Aim Meter Towards Z - Indicates Z Aiming Point for Variable Light Meter Type.
Summary
Specify the summary options to calculate. By default, average, maximum and minimum Illuminance, Exitance,Diffuse Luminance, and/or Daylight Factor are displayed along with uniformity ratios. Click here for more on Summaries.
Note: Exitance values are based on the Illuminance Units chosen in System Settings, not on the Display Units. If the Illuminance units are footcandles, Exitance values will be displayed in Lumens /Sq.Ft. If the Illuminance units are Lux, Exitance values will be displayed in Lumens/Sq.Meter.
Include Composite Summary - Indicates that a composite summary is displayed if calculation points are placed on related surface (Surface label is the same). Examples: Wall_Total, Ceiling_Total, etc. The composite grid is only calculated if the correlated grids all calculate the same metric (Illuminance, Exitance, Diffuse Luminance, or Daylight Factor). If any of the surfaces are associated with an alternate metric (e.g., 3 walls Illuminance, 1 wall Luminance or Daylight Factor), the Composite Surface grid will not be calculated.
Basic (Avg, Max, Min) - Indicates that the basic summary metrics are calculated. Precision level (Number of Decimal Places) applied is the same as for related calculation points.
Average/Minimum Ratio - Indicates that the Average-to-Minimum ratio (or Minimum-to-Average, if this option is specified in System Settings), is calculated. Precision level (number of decimal places) applied is the same as for related calculation points.
Maximum/Minimum Ratio - Indicates that the Maximum-to-Minimum ratio (or Minimum-to-Maximum, if this option is specified in System Settings), is calculated. Precision level (number of decimal places) applied is the same as for related calculation points.
Maximum/Average Ratio - Indicates that the Maximum-to-Average ratio is calculated. Precision level (number of decimal places) applied is the same as for related calculation points.
Number of Points - Indicates that the total number of points in each calculation entity is displayed. Removed points are not included in this value.
Coefficient of Variation - Coefficient of Variation is defined as the ratio of the standard deviation of all values to the mean (average) value. Note: CV is not calculated for composite grids (ceiling/top, walls/sides, or floor/bottom).
Uniformity Gradient - Uniformity Gradient measures the rate of change of values between adjacent measuring points, side to side, up-down, or diagonally. The UG value is expressed as a ratio of values. Note: UG is not calculated for composite grids (ceiling/top, walls/sides, or floor/bottom).
DF Basis (DF Calc Type Only) - The Exterior Illuminance used as the denominator in the Daylight Factor calculation. By default it is Off.
DF Percent (DF Calc Type Only) - Percentage of Points equal to or above % of Daylight Factor value (User defined, default is 2%). Note: DF is not calculated for composite grids (ceiling/top, walls/sides, or floor/bottom).
% Points in Range - Returns the percentage of the calculated values (any metric) within a designated range, including the minimum and maximum. Range Value 1 would be the minimum, and Range Value 2 the maximum. If you do not wish to limit the upper range or don't know the upper limit, simply enter a large value, e.g., 10000. Note: % Points in Range is not calculated for composite grids (ceiling/top, walls/sides, or floor/bottom).
Display (All calculation Points)
Select the display options, including precision, text color, visible lines, point markers and labeling.
Number of Decimals - Indicates the number of decimal places displayed in the calculation point value.
Mark Points - Indicates the measurement position of the associated light meter; position is indicated with a small shaded circle.
Meter Indicator - If turned On (default condition is Off), there will be a little line extending from the point showing the direction that the light meter is facing to "collect" light. Meter indicators are not shown in the Automatic Placement preview. Compatibility with earlier versions: If selected, meter indicators will be displayed in older versions of AGi32 until the calc points are edited.
Color - Indicates the color of the calculation value and Mark Point.
Labeling - Indicates if any Labeling options are applied to the selected grids. Click on the ellipsis (...) button to display the Calculation Points - Labeling dialog.
Session History
The Session History section indicates surface count as well as a running tabulation of the calculation options applied in this session.
Total Surfaces - The total surface count for the selected entity.
Number Selected/Tagged - The total number of surfaces currently selected and tagged. Any modifications applied are applied to all selected surfaces. Hint: If you wish to make individual changes to certain surfaces (not global changes, such as point spacing), remove all tags, then only select the surfaces you wish to apply these changes to.
Number of Surfaces Changed - Indicates the type of modification applied to all selected surfaces.