The Highlight Values command allows you to highlight calculation values that fall within user defined target ranges, including: Illuminance, Exitance,Glare Rating (GR) and Unified Glare Rating (UGR), Luminance, Veiling Luminance, Daylight Factor, Visibility Level (for STV), Intensity (Cd), Threshold Increment, and PPFD values. This option allows you to immediately see which calculation points fall above or below your design criteria. Highlight Values are global and, once defined, will apply to every calculation entity of that type in the job file. Specifying Highlight Values for metrics that have not been calculated will have no effect.
In addition, you may specify the global color that will be applied to each of the maximum and minimum calculation values.
You may also change the color associated with any range by clicking in the adjacent color box and selecting a different color. This option allows you to specify Highlight Values using a color palette, if desired, instead of a gray scale palette.
Specify Highlight Values for Illuminance
- From the Modify
menu choose Calculations - Highlight Values,
or from the Calculations Toolkit select
 .
. - To turn the Highlight Values on, click in the selection box adjacent to Highlight Illuminance Values. Highlight Values may be specified at any time, and switched off by clearing this option. Selecting this option will cause Highlighted Values to be displayed for any type of Illuminance that has been calculated: horizontal, vertical, surround, semi-cylindrical, and/or hemispherical.
- The Highlight color may be applied to the foreground (text color changes) or background (highlight color is applied to text box encompassing text, like a highlight marker). The default option is Foreground.
- To apply a Highlight color for the maximum and minimum illuminance values, click in the selection box adjacent to Maximum and/or Minimum. You may change their corresponding colors by clicking in the color box and selecting a different color.
- To apply a Highlight color to the values exhibiting the maximum Uniformity Gradient, click in the selection box adjacent to Uniformity Gradient. You may change the corresponding color by clicking in the color box and selecting a different color. The default color is Green.
- Note: Uniformity Gradient will only be highlighted if Uniformity gradient is included in the Calculation Summary (specified when creating or editing a calculation area).
- To specify value ranges, click in the selection box adjacent to the desired value range section.
- In the left-most text box, enter the target minimum illuminance value for this range. In the right-most box, enter the illuminance value corresponding to the target maximum value for this range.
- You may also change the color associated with this range by clicking in the adjacent color box and selecting a different color.
- You may continue specifying Illuminance highlight value ranges in this manner for up to 5 different ranges, by following steps 5 and 6.
- Click Ok to return to AGi32 with the selected highlights.
Specify Highlight Values for Exitance
- From the Modify
menu choose Calculations - Highlight Values,
or from the Calculations Toolkit select .
- Click on the Exitance tab to bring it to the forefront.
- To turn the Highlight Values on, click in the selection box adjacent to Highlight Exitance Values. Highlight Values may be specified at any time, and switched off by clearing this option.
- The Highlight color may be applied to the foreground (text color changes) or background (highlight color is applied to text box encompassing text, like a highlight marker). The default option is Foreground.
- To apply a Highlight color for the maximum and minimum Exitance values, click in the selection box adjacent to Maximum and/or Minimum. You may change their corresponding colors by clicking in the color box and selecting a different color.
- To apply a Highlight color to the values exhibiting the maximum Uniformity Gradient, click in the selection box adjacent to Uniformity Gradient. You may change the corresponding color by clicking in the color box and selecting a different color. The default color is Green.
- Note: Uniformity Gradient will only be highlighted if Uniformity gradient is included in the Calculation Summary (specified when creating or editing a calculation area).
- To specify value ranges, click in the selection box adjacent to the desired value range section.
- In the left-most text box, enter the target minimum Exitance value for this range. In the right- most box, enter the Exitance value corresponding to the target maximum value for this range.
- You may also change the color associated with this range by clicking in the adjacent color box and selecting a different color.
- You may continue specifying Exitance highlight value ranges in this manner for up to 5 different ranges, by following steps 6 and 7.
- Click Ok to return to AGi32 with the selected highlights.
Specify Highlight Values for Glare Rating (GR) and/or Unified Glare Rating (UGR)
- From the Modify
menu choose Calculations - Highlight Values,
or from the Calculations Toolkit select .
- Click on the GR/UGR tab to bring it to the forefront.
- To turn the Highlight Values on, click in the selection box adjacent to Highlight GR/UGR Values. GR/UGR Highlight Values may be specified at any time, and switched off by clearing this option.
- The Highlight color may be applied to the foreground (text color changes) or background (highlight color is applied to text box encompassing text, like a highlight marker). The default option is Foreground.
- To apply a Highlight color for the maximum and minimum GR/UGR values, click in the selection box adjacent to Maximum and/or Minimum. You may change their corresponding colors by clicking in the color box and selecting a different color.
- To apply a Highlight color to the values exhibiting the maximum Uniformity Gradient, click in the selection box adjacent to Uniformity Gradient. You may change the corresponding color by clicking in the color box and selecting a different color. The default color is Green.
- Note: Uniformity Gradient will only be highlighted if Uniformity gradient is included in the Calculation Summary (specified when creating or editing a calculation area).
- Uniformity Gradient is only available for Glare Rating calculation areas, not for UGR.
- To specify value ranges, click in the selection box adjacent to the desired value range section.
- In the left-most text box, enter the target minimum GR/UGR value for this range. In the right-most box, enter the GR/UGR value corresponding to the target maximum value for this range.
- You may also change the color associated with this range by clicking in the adjacent color box and selecting a different color.
- You may continue specifying GR/UGR highlight value ranges in this manner for up to 5 different ranges, by following steps 6 and 7.
- Click Ok to return to AGi32 with the selected highlights.
Specify Highlight Values for Luminance
The Luminance tab will create specify highlighting for the following commands: Roadway Luminance (Pavement Luminance) and Luminance, diffuse - available from the CalcPts - Automatic Placement command.
- From the Modify
menu choose Calculations - Highlight Values,
or from the Calculations Toolkit select .
- Click on the Luminance tab to bring it to the forefront.
- To turn the Highlight Values on, click in the selection box adjacent to Highlight Luminance Values. Luminance Highlight Values may be specified at any time, and switched off by clearing this option.
- The Highlight color may be applied to the foreground (text color changes) or background (highlight color is applied to text box encompassing text, like a highlight marker). The default option is Foreground.
- To apply a Highlight color for the maximum and minimum Luminance values, click in the selection box adjacent to Maximum and/or Minimum. You may change their corresponding colors by clicking in the color box and selecting a different color.
- To apply a Highlight color to the values exhibiting the maximum Uniformity Gradient, click in the selection box adjacent to Uniformity Gradient. You may change the corresponding color by clicking in the color box and selecting a different color. The default color is Green.
- Note: Uniformity Gradient will only be highlighted if Uniformity gradient is included in the Calculation Summary (specified when creating or editing a calculation area).
- To specify value ranges, click in the selection box adjacent to the desired value range section.
- In the left-most text box, enter the target minimum Luminance value for this range. In the right- most box, enter the Luminance value corresponding to the target maximum value for this range.
- You may also change the color associated with this range by clicking in the adjacent color box and selecting a different color.
- You may continue specifying Luminance highlight value ranges in this manner for up to 5 different ranges, by following steps 6 and 7.
- Click Ok to return to AGi32 with the selected highlights.
Specify Highlight Values for Veiling Luminance
- From the Modify
menu choose Calculations - Highlight Values,
or from the Calculations Toolkit select .
- Click on the Veiling Luminance tab to bring it to the forefront.
- To turn the Highlight Values on, click in the selection box adjacent to Highlight Veiling Luminance Values. Veiling Luminance Highlight Values may be specified at any time, and switched off by clearing this option. Selecting this option will cause Highlighted Values to be displayed for any type of Luminance that has been calculated: diffuse, roadway, background, and target luminance, as well as longitudinal uniformity.
- The Highlight color may be applied to the foreground (text color changes) or background (highlight color is applied to text box encompassing text, like a highlight marker). The default option is Foreground.
- To apply a Highlight color for the maximum and minimum Veiling Luminance values, click in the selection box adjacent to Maximum and/or Minimum. You may change their corresponding colors by clicking in the color box and selecting a different color.
- To apply a Highlight color to the values exhibiting the maximum Uniformity Gradient, click in the selection box adjacent to Uniformity Gradient. You may change the corresponding color by clicking in the color box and selecting a different color. The default color is Green.
- Note: Uniformity Gradient will only be highlighted if Uniformity gradient is included in the Calculation Summary (specified when creating or editing a calculation area).
- To specify value ranges, click in the selection box adjacent to the desired value range section.
- In the left-most text box, enter the target minimum Veiling Luminance value for this range. In the right-most box, enter the Veiling Luminance value corresponding to the target maximum value for this range.
- You may also change the color associated with this range by clicking in the adjacent color box, and selecting a different color.
- You may continue specifying Veiling Luminance highlight value ranges in this manner for up to 5 different ranges, by following steps 6 and 7.
- Click Ok to return to AGi32 with the selected highlights.
Specify Highlight Values for Visibility Level
- From the Modify
menu choose Calculations - Highlight Values,
or from the Calculations Toolkit select .
- Click on the Visibility Level tab to bring it to the forefront.
- To turn the Highlight Values on, click in the selection box adjacent to Highlight Visibility Level Values. Visibility Level Highlight Values may be specified at any time, and switched off by clearing this option.
- The Highlight color may be applied to the foreground (text color changes) or background (highlight color is applied to text box encompassing text, like a highlight marker). The default option is Foreground.
- To apply a Highlight color for the maximum and minimum Visibility Level values, click in the selection box adjacent to Maximum and/or Minimum. You may change their corresponding colors by clicking in the color box and selecting a different color.
- To specify value ranges, click in the selection box adjacent to the desired value range section.
- In the left-most text box, enter the target minimum Visibility Level value for this range. In the right-most box, enter the Visibility Level value corresponding to the target maximum value for this range. For example, to display negative contrast visibility levels, you may want to enter a range from –20 to 0.
- You may also change the color associated with this range by clicking in the adjacent color box and selecting a different color.
- You may continue specifying Visibility Level highlight value ranges in this manner for up to 5 different ranges, by following steps 6 and 7.
- Click Ok to return to AGi32 with the selected highlights.
Specify Highlight Values for Daylight Factor
- From the Modify
menu choose Calculations - Highlight Values,
or from the Calculations Toolkit select .
- Click on the Daylight Factor tab to bring it to the forefront.
- To turn the Highlight Values on, click in the selection box adjacent to Highlight Daylight Factor Values. Daylight Factor Highlight Values may be specified at any time, and switched off by clearing this option.
- The Highlight color may be applied to the foreground (text color changes) or background (highlight color is applied to text box encompassing text, like a highlight marker). The default option is Foreground.
- To apply a Highlight color for the maximum and minimum Daylight Factor values, click in the selection box adjacent to Maximum and/or Minimum. You may change their corresponding colors by clicking in the color box and selecting a different color.
- To specify value ranges, click in the selection box adjacent to the desired value range section.
- In the left-most text box, enter the target minimum Daylight Factor value for this range. In the right-most box, enter the Daylight Factor value corresponding to the target maximum value for this range. For example, to display all daylight factor values less than 2%, you may want to enter a range from 0 to 1.99.
- You may also change the color associated with this range by clicking in the adjacent color box and selecting a different color.
- You may continue specifying Daylight Factor highlight value ranges in this manner for up to 5 different ranges, by following steps 6 and 7.
- Click Ok to return to AGi32 with the selected highlights.
Specify Highlight Values for Intensity (Cd)
- From the Modify
menu choose Calculations - Highlight Values,
or from the Calculations Toolkit select .
- Click on the Intensity (Cd) tab to bring it to the forefront.
- To turn the Highlight Values on, click in the selection box adjacent to Highlight Luminous Intensity (Cd). Intensity (Cd) Highlight Values may be specified at any time, and switched off by clearing this option.
- The Highlight color may be applied to the foreground (text color changes) or background (highlight color is applied to text box encompassing text, like a highlight marker). The default option is Foreground.
- To apply a Highlight color for the maximum and minimum Intensity (candela, Cd) values, click in the selection box adjacent to Maximum and/or Minimum. You may change their corresponding colors by clicking in the color box and selecting a different color.
- To specify value ranges, click in the selection box adjacent to the desired value range section.
- In the left-most text box, enter the target minimum Intensity (candela, Cd) value for this range. In the right-most box, enter the Intensity (candela, Cd) value corresponding to the target maximum value for this range.
- You may also change the color associated with this range by clicking in the adjacent color box and selecting a different color.
- You may continue specifying Intensity (Cd) highlight value ranges in this manner for up to 5 different ranges, by following steps 6 and 7.
- Click Ok to return to AGi32 with the selected highlights.
Specify Highlight Values for Threshold Increment
- From the Modify
menu choose Calculations - Highlight Values,
or from the Calculations Toolkit select .
- Click on the Threshold Incr. tab to bring it to the forefront.
- To turn the Highlight Values on, click in the selection box adjacent to Highlight Threshold Increment (TI). Threshold Increment (TI) Highlight Values may be specified at any time, and switched off by clearing this option.
- The Highlight color may be applied to the foreground (text color changes) or background (highlight color is applied to text box encompassing text, like a highlight marker). The default option is Foreground.
- To apply a Highlight color for the maximum and minimum Threshold Increment (TI) values, click in the selection box adjacent to Maximum and/or Minimum. You may change their corresponding colors by clicking in the color box and selecting a different color.
- To specify value ranges, click in the selection box adjacent to the desired value range section.
- In the left-most text box, enter the target minimum Threshold Increment (TI) value for this range. In the right-most box, enter the Threshold Increment (TI) value corresponding to the target maximum value for this range.
- You may also change the color associated with this range by clicking in the adjacent color box and selecting a different color.
- You may continue specifying Threshold Increment highlight value ranges in this manner for up to 5 different ranges, by following steps 6 and 7.
- Click Ok to return to AGi32 with the selected highlights.
Specify Highlight Values for PPFD
- From the Modify
menu choose Calculations - Highlight Values,
or from the Calculations Toolkit select .
- Click on the PPFD tab to bring it to the forefront.
- To turn the Highlight Values on, click in the selection box adjacent to Highlight PPFD. PPFD Highlight Values may be specified at any time, and switched off by clearing this option.
- The Highlight color may be applied to the foreground (text color changes) or background (highlight color is applied to text box encompassing text, like a highlight marker). The default option is Foreground.
- To apply a Highlight color for the maximum and minimum PPFD values, click in the selection box adjacent to Maximum and/or Minimum. You may change their corresponding colors by clicking in the color box and selecting a different color.
- To specify value ranges, click in the selection box adjacent to the desired value range section.
- In the left-most text box, enter the target minimum PPFD value for this range. In the right-most box, enter the PPFD value corresponding to the target maximum value for this range.
- You may also change the color associated with this range by clicking in the adjacent color box and selecting a different color.
- You may continue specifying PPFD highlight value ranges in this manner for up to 5 different ranges, by following steps 6 and 7.
- Click Ok to return to AGi32 with the selected highlights.
How is Highlight Color applied?
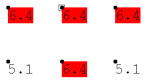
Highlight Values - Foreground Color
When the Foreground option is selected, the highlight color is applied to the text. Highlight Value colors are included in AGi32's exported CAD output - text is highlighted.
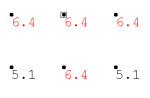
Highlight Values - Background Color
When the Background option is selected, the highlight color is applied to a box encompassing the text, much like marking the text with a highlighter. Highlight Value colors are included in AGi32's exported CAD output, but only the text is highlighted (i.e., foreground).