
![]()
Using Render Mode Animation Points
In Render Mode, any view can be captured for playback or animation. The Animation dialog provides your control point for creating and managing your animation points and their display order and Interval. Resulting animations can be exported as movies for playback using industry standard movie files.
To create an animation point, manipulate the view to display the view you desire to capture, then use the F2 key to quickly capture the view and add it to your animation points display list. When Animation Points are added this way, they are automatically assigned the sequential name Render_# (e.g. Render_1, Render_2, etc.). You may rename these views at any time in the Animation dialog.
Once created, you may display the animation points individually or sequentially with the Slide Show buttons on the Render Toolkit.
Note: The following interactive commands may be used to obtain a View suitable for capture within animations: Dolly, Pan, Rotate, Orbit and Walk. Clip and Zoom should not be used, and their settings will be ignored, as they do not change the Eye or Focus positions required. Clip and Zoom only change the clipping planes and viewing angles, respectively; these settings are not used in animations.
Manage Scenes
Rename a scene
Scenes may be renamed within the Animation dialog. Scene names must be unique and contain only valid characters (no * . / \ ?).
- Select Animation from the Render Toolkit.
- If more than one scene is defined, select the scene to be renamed from the Current Scene Name drop down list.
- Click the Rename Scene button
 .
. - In the Rename Scene text box, enter the new scene name, up to 256 characters long.
- Click OK.
Create multiple scenes
Multiple scenes creation allows you to playback various lines of motion separately (e.g. walk-through, fly over). Scene names must be unique and contain only valid characters (not * . / \ ?).
- Select Animation from the Render Toolkit..
- Click the Create New Scene button
 .
. - In the New Scene textbox, enter the new scene name, up to 256 characters long.
- Click Ok.
- You may continue adding new scenes in this manner.
Delete a scene
Scenes may be deleted within the Animation dialog. When a scene is deleted, all the animation points within the scene are deleted as well.
- Select Animation from the Render Toolkit.
- If more than one scene is defined, select the scene to be deleted from the Current Scene Name drop down list.
- Click the Delete Scene button
 .
.
Make a scene current
To add animation points to an alternate scene, the scene must first be defined, then selected as current before the animation points are added.
- On the Animation toolbar, click in the Current
Scene Name drop down list
 .
. - Select the Scene name you wish to make current.
Manage Animation Points
Append an animation point to the current scene
To add an animation point, the current view must display the animation point you wish to capture. You may use any of the predefined views to create an animation point or use the Interactive View commands to create a custom animation point.
Once the Render view displays the view you wish to capture, proceed.
- Press the F2 key from the keyboard to apply the Animation Quick Add command which automatically captures the current view using an automatic naming system.
- Repeat as necessary.
Inserting animation points(s) within the current scene
To insert animation points within a scene at a specific location, you must begin within the Animation dialog. You may insert a single additional animation point or multiple animation points in sequential order as desired.
Animation Point are dynamically specified after selecting the Insert Point Above or Below command. Once the views are set, right click to insert the animation point parameters to the current scene and return to the Animation dialog.
Note: You must return to the Animation dialog by right clicking (to accept the view) or by pressing the Esc key repeatedly until the Animation dialog reappears (to cancel the Insert process). Otherwise all other Render functionality is locked (besides Preset or Interactive View commands) until the command is completed.
- Select Animation from the Render Toolkit..
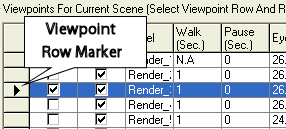
- Select the Animation Point you wish to use as the current marker (you are choosing to insert a new animation point above or below this point).
- You can display any animation point on the screen by clicking in the Display checkbox within the Animation Point row.
- To select an animation point, click on the row marker.
- Select the Insert Point Above/Below command
(

 ) from the toolbar or menu (right-click on the selected row marker to display
the secondary menu).
) from the toolbar or menu (right-click on the selected row marker to display
the secondary menu). - Control will return to the environment allowing you to navigate to the desired view. Note: The following interactive commands may be used to change the View parameters: Dolly, Pan, Rotate, Orbit and Walk. Clip and Zoom should not be used, and their settings will be ignored, as they do not change the Eye or Focus positions required. Clip and Zoom only change the clipping planes and viewing angles, respectively; these settings are not used in animations.
- Once the view is obtained, right click to confirm your selection. You will return to the Animation dialog with the current view inserted in the desired location. The inserted views are labeled Insert_1,etc.
- To cancel the insert process and return to the Animation dialog without specifying any points, press the ESC repeatedly until the Animation appears.
Reorder the Animation Point display order
To reorder an animation point, highlight the point row in the Animation dialog then select Move Up or Move down from the secondary menu.
- Select Animation from the Render Toolkit..
- Highlight the desired point row by clicking
on the row marker.
- Right click to display the secondary menu or use the Move Up/Move
Down buttons (

 ).
Move Up moves the point up in the list, Move Down moves the point
down in the list.
).
Move Up moves the point up in the list, Move Down moves the point
down in the list.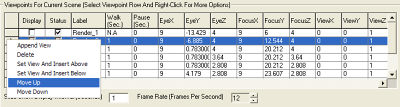
Rename an Animation Point
To rename an animation point, highlight it in the Animation dialog then click on it again.
- Select Animation from the Render Toolkit..
- Highlight the desired point name in the Label column.
- Left click on the name again to rename it directly in the highlighted area.
- Rename the point, then press ENTER or move to another cell to complete the process.
Copy Animation Points
To copy a single point, highlight the point to be copied in the Animation dialog and select the Copy Above or Below command. Only single points may be copied, if multiple points are selected, only the first is copied.
- Select Animation from the Render Toolkit..
- Highlight the desired oint by selecting the Row Marker
- Select the Copy Above/Below command
(

 ) from the toolbar or from the
menu (right-click on the selected oint row marker to display
the secondary menu).
) from the toolbar or from the
menu (right-click on the selected oint row marker to display
the secondary menu). - The selected point will be copied to the specified location.
- Click Ok.
Move Animation Points
To move a single animation point, highlight the point to be moved in the Animation dialog and select the Move Up or Down command. Only single points may be moved, if multiple points are selected, only the last is moved.
- Select Animation for the Render Toolkit..
- Highlight the desired point by selecting the point Row Marker
- Select the Move Up/Down command ( ) from the toolbar or
menu (right-click on the selected viewpoint row marker to display the
secondary menu).
- The selected point will be copied to the specified location.
- Click Ok.
Delete Animation Points
To delete animation points, highlight it in the Animation dialog and click the Delete button. You may delete multiple oints at the same time by using Windows selection methods (Shift+Click selects adjacent rows, Ctrl+Click selects individual rows).
- Select Animation from the Render Toolkit.
- Highlight the desired points by selecting
the point Row Markers
- There are three methods provided for deleting oints:
- Press the Delete key on your keyboard.
- Click the Delete button
 .
. - Right click on the Row Marker to display the secondary menu - select Delete.
- The selected points will be deleted.
- Click Ok.
Turn off an Animation Point within a scene
Turning off an animation point allows you to remove points from the animation or slide show playback without requiring the point to be deleted.
- Select Animation from teh Render Toolkit..
- Use the Status checkbox to turn a point on or off.
Animation Point Playback
Animate your Animation Points
Animation Points may be animated from within the Animation dialog or directly in Render mode from the Render Toolkit. Animation playback always begins with the first animation point and loops through all the points in sequential order until the animation is stopped.
Animations are created by creating additional varying views between the specified animation points. The additional views added in between animation points is a function of Frame Rate and Walk interval.
For example, at a Frame Rate of 15fps, it would require 30 frames to move between 2 points with a 2 second Walk interval.
Frame Rate is defined as the number of frames per second (fps) used to generate the animation. Higher frame rates will result in smoother playback but also much larger movie files (when the movie is exported). The Frame Rate specified in the Viewpoints dialog is not necessarily applied when the movie is exported, an alternate frame rate may be applied within the movie file.
![]() Large or complicated environments or slow processors may
produce undesirable animations. Walk times may not be achieved if the
time necessary to display the render view exceeds the specified walk time.
In this case, if the animation playback does not correspond to the "real-time"
playback specified in the Animation dialog, which is a function of frame
rate and walk and pause intervals, AGi32 will display a warning icon during
playback -
a Stop icon with an exclamation mark. Reducing the frame rate may alleviate
this playback problem. This problem does not occur in generated
movie files.
Large or complicated environments or slow processors may
produce undesirable animations. Walk times may not be achieved if the
time necessary to display the render view exceeds the specified walk time.
In this case, if the animation playback does not correspond to the "real-time"
playback specified in the Animation dialog, which is a function of frame
rate and walk and pause intervals, AGi32 will display a warning icon during
playback -
a Stop icon with an exclamation mark. Reducing the frame rate may alleviate
this playback problem. This problem does not occur in generated
movie files.
Note: A Frame Rate = 0 has the same effect as Slide Show (in which case Pause intervals may be applied to "hold" the slides).
- From the View
menu select Animate, or from the
toolbar select
 .
. - Click to stop the animation.
Edit your Animation Points
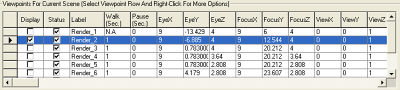
To fine tune a scene, it may be necessary to edit one or more of the animation point metrics. Typical modifications include: Label, Walk Time, Pause Time and Eye and Focus Z-coordinate. Animation Point editing must be done within the Animation dialog.
- Select Animation from the Render Toolkit..
- To edit the contents of a single point, click in the cell you wish to modify. The following modifications are available within each point:
- Label – You may want to change the point label for easier identification
- Walk Time – This is the time (in decimal seconds) it takes to ‘move’ from one point to the next. By default, Walk Time is set to 1 sec. It may be desirable to increase Walk Time to slow down the animation.
- Pause Time – This is the time (in decimals seconds) one can pause at a particular point during animation before continuing on to the point.
- Eye Z and Focus Z - Changing the Eye and Focus Z-coordinate may be useful if want to change your eye height. For example: You may want to change the Eye and Focus Z to the height of a standing (5 ft.) or sitting person (2.5ft.). Changing the Eye and Focus Z will result in a point that looks straight ahead, Changing the Focus Z to a height higher or lower than the Eye Z will result in the viewer looking up or down, respectively.
- View X, Y, Z - These unit direction vectors indicate which way is "up" relative to the eye position.
- (0, 0, 1) - X = 0, Y = 0, Z = 1 indicates that Z is up relative to the point and the camera is looking straight ahead. A negative one (-1) Z value indicates an upside down view (camera is looking behind the eye position)
- (0, 1, 0) - X = 0, Y = 1, Z = 0 indicates that Y is up relative to the point (Top View). A negative one (-1) value indicates a Y Bottom view.
- (1, 0, 0) - X = 1, Y = 0, Z = 0 indicates that X is up relative to the point (bottom of scene is running straight up and down the view, Y is to the left).
- To Bulk Edit multiple Animation Points at once, highlight
the desired points by selecting the Row Markers
- Right click on the on the Row Marker to display the secondary menu - select Bulk Edit. The following modifications are available within Bulk Edit:
- Walk Time
- Pause Time
- Eye X, Y, Z
- Focus X, Y, Z
- View X, Y, Z
- You can preview your Walk and Pause changes by
clicking on the Animate button .
- You can preview your Eye, Focus and View vector changes by redisplaying the view (display another point, then redisplay changed point to update screen display).
Change the Slide Show Display Interval
The Slide Show Display Interval specifies how often the Animation Points cycle in the Slide Show when displayed sequentially. To change the Slide Show Display Interval, specify the new time, in seconds, in the Animation dialog.
- Select Animation from the Render Toolkit..
- Change the value in the Slide Show Display Interval text box to the desired times in Seconds.
- To preview the Display Interval, click the
Playback button
 .
. - Animation Points will cycle sequentially in Render mode until you click again.
- The Animation dialog will reappear.
Recall an Animation Point
To recall an Animation Point, you may use the Animation dialog or use the Slide Show buttons on the Common Toolbar.
To recall a specific animation point, use the Animation dialog.
- Select Animation from the Render Toolkit..
- Checkmark the Display selection box to update the current animation point displayed in Render mode.
Display all Animation Points sequentially
To display the animation points sequentially (as in a slideshow), you may use the Animation dialog or use the Slide Show buttons on the Common Toolbar.
To display the animation points sequentially using a consistent display interval, click the Start button on the Common Toolbar or use the Animation dialog.
- Select Animation from the Render Toolkit..
- Animation Points whose Status is On will be displayed. You may change a point's status to off by unchecking it, in order to remove it from the sequential slide show display.
- Click the Playback button . The animation point
will be displayed for the number of seconds shown in the Display Interval
text box, after which the Animation dialog will return.
Set a consistent walk speed
To set a user defined walk speed, to be applied consistently across all animation points, click the Set Walk Speed button in the Animation dialog.
- Select Animation for the Render Toolkit..
- Select the Set Walk Speed command (
 ) .
) . - The Walk Speed dialog will appear allowing you to set a factory defined walk speed or a custom speed.
- You can preview your Walk speed changes by clicking
on the Animate button .
Movie Creation
Create Movies from Animations
Animations may be exported as AVI files for playback on industry standard media players from the Animation dialog.
Note: A Frame Rate = 0 has the same effect as Slide Show (in which case Pause intervals may be applied to "hold" the slides).
- Select Animation from the Render Toolkit.
- Click the Create Movie File button
 .
. - The Create Movie File dialog will appear prompting you to select your production, image and movie parameters.