
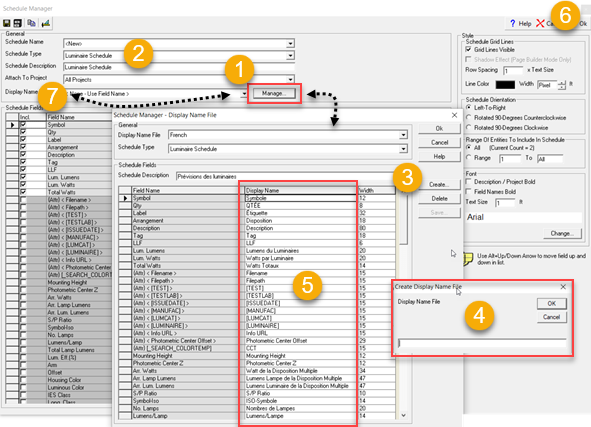
Schedule Manager - Display Name File
The Display Name is the field's heading name that will be displayed in the schedule. By default, this is the same as the Field Name, but it can be changed by editing the Display Name field directly or by choosing a Display Name File that contains information on the desired changes.
For example, you may choose to display the names of the selected fields in a language other than English. Currently, Spanish, French and Portuguese are available. This is done by clicking the down arrow next to the Display Name File field and selecting the language desired.
You can also create your own Display Name File with Display Names that are different from the Field Names.
- Begin by clicking on the Manage button next to the Display Name File field.
- The Display Name File dialog will open. From the Schedule Type drop-down menu, select the Schedule that you would like to create a Display Name File for.
- Click on the Create... button.
- In the dialog box that opens, type in a name for the file. For example, if you are required to use certain field headings in all of your company's schedules, you could call your Display Name File "XYZ Engineering." Click OK to accept the name that you have entered and return to the Display Name File dialog.
- You can now change the names in the Display Name column. Click once in a field to give it focus. Click again in that field to highlight the contents. You can either type additional characters, or you can hold your left mouse button down, drag across the characters, and then type to replace them.
- Click OK to exit this dialog and return to the Schedule Manager dialog.
- Click on the down arrow next to the Display Name File field; your custom Display Name File has been added to the list, in alphabetical order with the French, Portuguese and Spanish choices. Note: The custom Display Name File applies only to the schedule type that it was created for. Other schedule types would need their own Display Name Files, if applicable.
To edit a Display Name File that you have created:
- Select the schedule type whose Display File Name you wish to edit.
- Click the Manage button.
- Make your changes; click Save to save changes and continue making changes or click Ok to save changes and exit dialog. Note; Once you click Save, changes are NOT undone if you click Cancel.
See also: Adding Schedules - Procedures, Concepts