
Schedules are dynamic drawing entities that extract information from the job file and place it in a user-defined table. You may customize the default schedules to include as much or as little information as you would like. Schedules update at every redraw and will automatically expand or contract as the number of related entities increases or decreases. Schedules may be pasted directly into a view in Model Mode or onto a Reports page.
Each cell has its own intrinsic length associated with the selected field. You may increase or decrease the cell size, as desired.
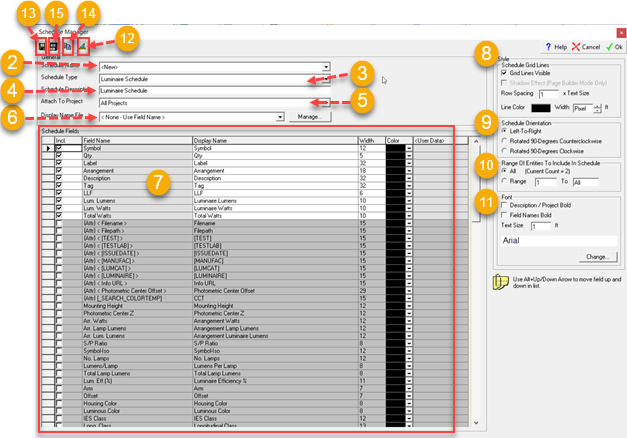
- From the Add
menu choose Drawing - Schedule,
or from the Drawing/Schedules Toolkit, select
 .
. - The Name field holds schedules you have saved with your own name and a few predefined factory schedules. New users will likely move straight to step #3 leaving the <NEW> designation in this field. To use a custom or predefined schedule, make your selection from the Schedule Name menu. All of your saved schedules will be added to this list.
- If not using a custom or predefined schedule, select a schedule type from the Schedule Type pull-down menu.
- If desired, you may change the current Description.
- Attach To Project or Metric Type option: For Isolines Legend Schedules, this option is Metric Type. For all other Schedule Types, this option is Attach to Project.
- Attach To Project: The schedule may pull data across all projects or one specific project. If desired, select which project (if more than one exists) this schedule will reference. The Project Name row is only included in the specified schedule if a specific Project is selected. If All Projects ( the default option) is selected, the Project Name row is not included in the schedule.
- Metric Type: The pull-down menu allows you to select the applicable calculation metric (Illuminance, Luminance, etc.). If you have multiple metrics, a separate Isoline Legend must be created for each desired metric type (i.e., cannot combine them in one legend due to different units types). Note: An Isoline Legend will only be populated with Color and Value if the corresponding metric is enabled in the isoline dialog and values are defined.
- The Display Name File enables you to display the schedule's selected fields in a language other than English. Currently, Spanish, French and Portuguese are available. Click on the Manage button. In the next dialog, pick the language that you want from the Display Name File menu. More information on Display Name Files here.
- A default schedule layout is available for each Schedule Type. You may customize the schedule layout by choosing additional or alternate selected fields, reordering the schedule, changing the cell length, and/or changing the color.
- To choose additional or alternate fields, click the selection boxes so that a check mark appears next to the fields you wish to include.
- To change the Field Length or Color, or to Rename a user-defined field, right click on the field you wish to change.
- You may change a field's Display Name, Width and Text Color. If the field Width is shorter than the associated contents, the text inside the field will be truncated. The Field Name is not modifiable; if you wish to use a name that is different than the default, change the Display Name cell's contents.
- New in version 20, you can select from factory or your own custom Attributes when adding fields to your schedules. Learn more about Attributes here.
- There are several user-defined fields (e.g., <UserField1>) available in each schedule type (located at the bottom of the list of available fields). Simply place a check mark in the box to select the field, enter a name in the Display Name field, and enter the appropriate information in the User Data field. More information on user-defined fields here.
- Style Options:
- Grid Lines are Visible by default. Unchecking this selection box will make them Invisible.
- To add a Shadow Effect around the lower right frame of the schedule, select this option. Shadows are only available in Reports.
- To Increase the Row Spacing, enter a value greater than 1. Increasing the Row Spacing adds more white space around your text; it also allows symbol size to be increased in the Luminaire Schedule Type.
- The Grid Line and Color and Width is also customizable. The defaults are Black and 1 Pixel Line Width.
- Schedule Orientation:
- Left to Right: Orients Schedule and included text Left to Right; Insertion Point at Top Left
- Rotated 90 Degrees Counterclockwise: Orients Schedule Up and Down - Text Flows from Bottom to Top; Insertion Point at Bottom Left
- Rotated 90 Degrees Clockwise: Orients Schedule Up and Down - Text Flows from Top to Bottom; Insertion Point at Top Left
- Range of Entities to Include in Schedule:
- All: Extracts all relevant information from associated job file/Project into one schedule. Total Count is displayed for your information.
- Range: Specify a user-defined Range to split any Schedule into multiple parts (e.g., split a Luminaire Location Summary composed of 100 luminaire locations into 2 pieces: Schedule 1: Range 1- 50; Schedule 2: Range 51-All ). The All parameter is used to automatically include any luminaires added to the job file after the schedule is placed.
- Font Options:
- To make the Description and Project cell text bold, click in the selection box adjacent to Description / Project Bold.
- To make the text in the field header cells bold, click in the selection box adjacent to Field Names Bold.
- If desired, change the text font or Text Size . Clicking on the Change button will allow selection of a different font and/or font color. Changes made here will apply to all cells in the Schedule. The Text Size will control the size of the schedule and its legibility on your drawing or report.
- Schedules extract data from all associated entities
in their category. You may filter which Calculation Points, LPD Areas
and Stat Areas are referenced by using the Project Manager dialog. The
Statistical Summary Specification button (
 )is located in
the upper-left corner of the Schedule Manager dialog. In Project Manager, select the appropriate Entity (CalcPts, etc.). Next, in the Sum column unselect any items that you do not wish to include in the schedule. (Stretch the dialog's width if necessary to see all of the columns.) Click OK to keep these changes and return to the Schedule Manager dialog.
)is located in
the upper-left corner of the Schedule Manager dialog. In Project Manager, select the appropriate Entity (CalcPts, etc.). Next, in the Sum column unselect any items that you do not wish to include in the schedule. (Stretch the dialog's width if necessary to see all of the columns.) Click OK to keep these changes and return to the Schedule Manager dialog. - To Save this schedule so that it may be reused
in any other job file, click the Save button (
 ) located
in the upper-left corner of the Schedule Manager dialog. Specify the name
(we recommend
the following format: Schedule Type - Description), then click the Save
button. Click OK. Depending on which mode you were in when the schedule was
selected (Model or Reports), the saved schedule will be saved in
the Model Mode Schedules or Reports Schedules dialog.
) located
in the upper-left corner of the Schedule Manager dialog. Specify the name
(we recommend
the following format: Schedule Type - Description), then click the Save
button. Click OK. Depending on which mode you were in when the schedule was
selected (Model or Reports), the saved schedule will be saved in
the Model Mode Schedules or Reports Schedules dialog. - Schedules may be used in other applications by
copying them to the Clipboard. The Copy button (
 ) is also
located in the upper-left part of the Schedule Manager dialog.
) is also
located in the upper-left part of the Schedule Manager dialog. - Delete Saved schedule files by clicking on the file cabinet icon to open the dialog listing all saved schedules.
- Click OK button in the upper right corner of the dialog.
- Locate the schedule on the drawing and click the left mouse button. The cursor is located at the upper-left corner of the schedule. You can dynamically re-size the schedule before clicking, by using the Ctrl+Shift + Up Arrow and Ctrl+Shift + Down Arrow keys on your keyboard.