

Background Images - Procedures
The command for loading background images into AGi32 can be found in four locations: on the Status Toolbar at the bottom of the screen, from the File-Import command on the Main toolbar and in the File menu, and by clicking on Background Images command in the Tools menu. The easiest approach is by clicking on the button on the Status Toolbar.

Upon selecting the command, the Background Images Settings dialog opens and provides options for selecting up to eight images (JPG, BMP, PNG or PDF) to load in as background in Model Mode and optionally, saved as a texture for Render mode. Before completing the process, the images may be repositioned relative to each other, scaled individually or as a group, "faded" so that they are less distinct, and so on.
Watch the video to see how it's done.
Watch the video to automatically create a texture map.
Procedures
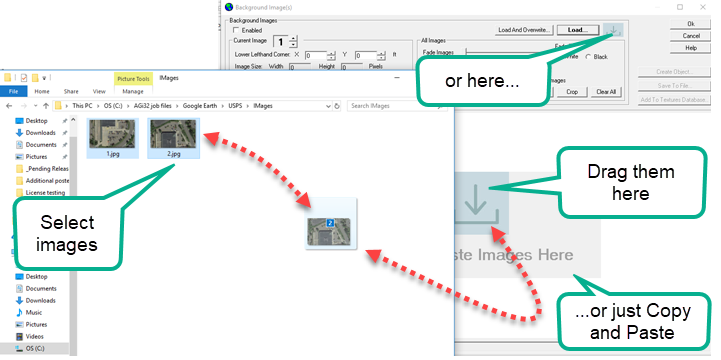
- Load one or more images: Click the Load button and select one or more images (can select multiple files at one time using Windows standard selection methods). They will be loaded into the Preview display area in the order that they are listed when selected. Images may also be loaded with drag-and-drop method (see image below, drag image files from current location into the Preview area) or can be Pasted from the clipboard.
- If one or more images have been previously loaded, newly loaded images will be placed into first available positions.
- If Load and Overwrite is selected, newly loaded images will be placed beginning at Current position, replacing (overwriting) any images already in that and subsequent positions.
- If a PDF with more than one page is selected, you will be given the opportunity to select which pages to import. See the topic Multiple Page PDF Import for more information.
- Scale individually or all together. (See Notes below.)
- To Clear an undesired image: Click on the Clear button and then click on the image to be cleared (deleted). (This function cannot be undone.)
- If multiple images have been loaded, move images as desired to get them into correct relative positions: Click on Move button; click on point to move from; click on point to move to. Repeat as needed.
- To create one rectangular image from several overlapping images, click on the Crop button. Then click one corner of your intended new image and holding down the left mouse button, drag your cursor to the opposite corner of your intended new image, and then release the mouse button. If you aren't happy with the result, click on the Uncrop button (formerly the Crop button). Notes about Cropping:
- Once you click OK and exit the dialog, the original images are replaced with the cropped image. Therefore, if you wanted to re-crop using the original images, you would need to reload the original images into the Background Images dialog and start over.
- Image labels are automatically disabled and fading is reset prior to cropping. Therefore, Crop (if desired) before Fading.
- Clearing the cropped image has the same effect an un-cropping; the original images are restored and the cropped image is destroyed.
- In addition to cleaning up the edges of stitched-together images, cropping reduces overhead by replacing multiple images with one image.
- If desired, set X and Y coordinates for the lower left-hand corner (LLHC) of the image(s). The default position is 0,0.
- Alternatively, use the Locate command to place the background image in a specific location in Model Mode: Click on the Locate button. Click on a specific location in the background image. AGi32 return you temporarily to Model Mode, where you then click on the location for that selected point. You will then be returned to the Background Images dialog where you can make any remaining changes, such as Fading the image. If multiple images are loaded into the Background Images dialog, they will keep their relative positions when brought into Model Mode using this method.
- Fade images as desired by moving the slider to the right.
- Optionally, click the Create Object or Add to Textures Database buttons for different paths to use the images in Render Mode.
- Click OK to complete the command.
- The image will be placed in Model Mode according to the X,Y coordinates set for the LLHC.
Drag and Drop
Notes regarding scaling images
- If all images were captured at the same scale:
- Load all images (multi-select).
- Scale All: Select (click on) dimension start and end points. After you click the 1st reference point when scaling background images, if you press and hold the Ctrl key, the cursor will be locked to the same X or Y (ortho) as the 1st point. This ensures the 1st and 2nd points are along the same axis. In dialog that subsequently opens, enter the distance between the selected points.
- Click the Refresh button to zoom extents.
- If images were captured at different scales:
- Load image.
- Select Label Images, to be able to identify which is considered the Current Image, by number. (The number will not be part of the final, imported image.)
- Scale Current: Select (click on) dimension start and end points; in dialog that opens, enter the distance between the selected points.
- Advance to next image, Scale Current; repeat as applicable.
- Click the Refresh button to zoom extents.