
Luminaire Labels
It is often helpful to be able to add a text label to each luminaire location on your drawing in Model mode. This might be as simple as the luminaire number or a series of text lines providing a complete description. The choice is yours and changes are easy to make until you like the results.
Labels can be assigned to the luminaire insertion point, and/or aiming point. When labeling luminaire locations or aiming points, every occurrence of the luminaire is labeled. Luminaire labels are dynamic. They will update during every redraw to reflect any changes in the luminaire definition or location parameters. Labels cannot be edited as text entities directly (using text commands) but all information is under your control through the Label command and the associated Luminaire definition.
Add Luminaire Labels
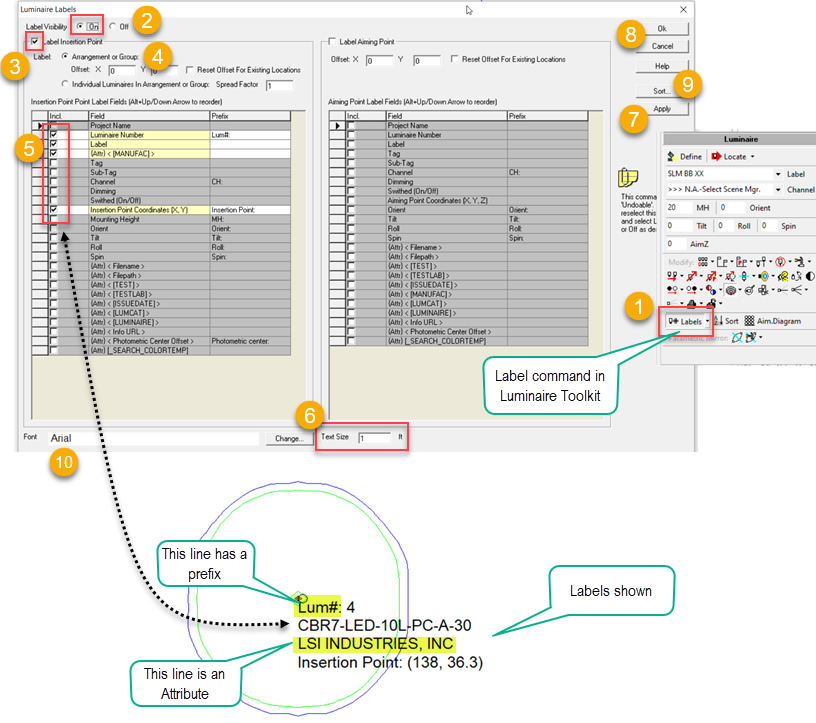
- Access the Labels command from the Labels button in the Luminaire Toolkit, or from the Add menu choose Luminaire - Specify Labels.
- Set the Label Visibility radio button to On.
- Select Label Insertion Point check box ( and/or Label Aiming Point).
- Choose whether to label Arrangements and Groups with one label, or to label each individual luminaire in the Arrangement/Group. The default behavior is one label per arrangement or group.
- Arrangement or Group: Specify the Offset between the luminaire's insertion point (and/or aiming point) and the top-left portion of the luminaire Label.
- By default, the Reset Offset for Existing Locations check box is enabled when a new Offset value is entered. When enabled, all luminaire labels will use the newly specified offset parameters, including luminaire labels that have been moved.
- To retain current luminaire label locations, and only apply the offset to new luminaire instances, unselect the Reset Offset for Existing Locations check box. When this check box is unselected, all existing luminaires will retain their current offset parameters (whether the label has been moved separately or not), and the new offset will only be applied to new luminaire locations.
- Individual Luminaires In Arrangement or Group: Labels are placed relative to the individual luminaire location insertion point and are adjusted based on: orientation angle, length of label, proximity with other labels, and symbol magnifying factor.
- If Sub-Tags have been specified for the components of a Group, this option may be selected for the Label.
- Spread Factor: Increases or decreases the label offset relative to its default "smart" label location. This may be useful for repositioning labels that overlap each or the symbol.
- Select the labeling options to be included with every luminaire from the list. Options can be different for Insertion Point and Aiming Point.
- Select the Label Text Size in scaled units (ft or m).
- If you would like to preview the changes on your drawing before implementing, click the Apply button. With the dialog still open, make any necessary changes.
- Click OK when ready to complete the command.
- OPTIONAL: If sorting of luminaires (re-sequencing) is desired, click the Sort button.
- OPTIONAL: Specify the Font and Font Style to use for the luminaire labels.
Using Prefixes
You can add a prefix to any text label by entering the desired text prefix in the Label fields list. Factory Label items such as Orient have existing prefixes. You can remove these for your purposes if necessary. As an example, in the captures above and below we have used a prefix of Lum#: for the Luminaire Number field. Prefixes can be used for insertion point and aiming point labels and they can be different.

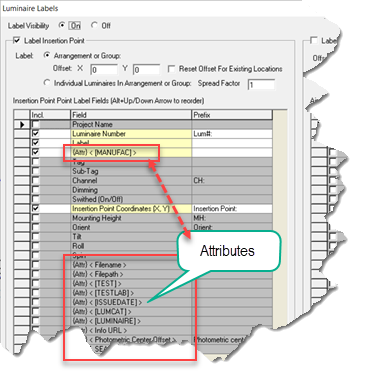
Using Attributes
Attributes are specific data fields that can be associated with a luminaire definition. They can be user generated (custom) or can be included with AGi32. They are created in the Luminaire Attributes/Grid tab of System Settings and assigned values specific to your luminaire definitions in the Luminaire Define dialog.
You can use any of the Attributes listed when composing your desired luminaire Label text. In the captures above we have used the [MANUFAC] keyword response from the IES file as this is one of the Attributes that comes with AGi32. In the list of text fields for insertion point or aiming point, all attributes are shown with {Attr} so you can easily spot them. Attributes do not need to be used in the luminaire definition to be available for Labels.
Move Individual Luminaire Labels
Luminaire labels may be moved from their default location to another location to improve the visual clarity of the presentation. In cases where luminaires are stacked in the Z direction, their labels are also stacked on top of each other. When the label is selected, the entire label is moved from one location (Luminaire Label – Luminaire Number, Coordinates, Aiming Parameters, etc.) to another. Luminaire labels may be moved at any time and they will retain their position even if the luminaire is modified.
Note: Individual labels for luminaires in an Arrangement or Group may not be moved independently. Moving one label in an Arrangement or Group moves them all.
- From the Modify menu, select Luminaire - Labels - Move. Or in the Luminaire Toolkit, click on the down-arrow adjacent to the Labels button to see the secondary menu.
- Select Move.
- Select the label to move.
- Left-click the mouse on the point to move the label from.
- Left-click on the new location for the label.
Delete Individual Luminaire Labels
Luminaire labels may be deleted on an individual basis.
Note: Individual labels for luminaires in an Arrangement or Group may not be deleted independently. Deleting one label in an Arrangement or Group deletes them all.
From the Modify menu, select Luminaire - Labels - Delete. Or in the Luminaire Toolkit, click on the arrow adjacent to the Labels button to see the secondary menu. Select Delete.
- Select the label to be deleted.
- Continue selecting labels if you plan to act on more than one. When complete, press Enter (or right-click with mouse) to confirm your selections and delete the labels.
General Notes:
- Changing the Luminaire Symbol Magnifying Factor does not update luminaire labels. Therefore, it may be necessary and desirable to re-label after changing the Magnifying Factor (simply open Labels dialog and click OK).
- A "smart labeling" process has been optimized for single, small labels. However, smart labeling isn't perfect; some labeling issues will occur in some cases, e.g., overlapping labels. In this case, individual labels may be moved (see Move).
- Luminaire labels are attached to the luminaire position, when a luminaire is moved, the label moves as well. This relationship prevents deleting a luminaire’s label without deleting the luminaire. The luminaire label uses the luminaire’s Model Mode Symbol color.
- Luminaires placed with Locate and Orient or Static Aiming have aiming points that match their insertion points. Labeling their aiming points will result in duplicate labeling.