
![]()
Textures are images that are applied to surfaces when rendered in AGi32. Textures provide a method to make your visualizations appear more relaistic. They can be most useful for materials like brick, marble, tile etc.
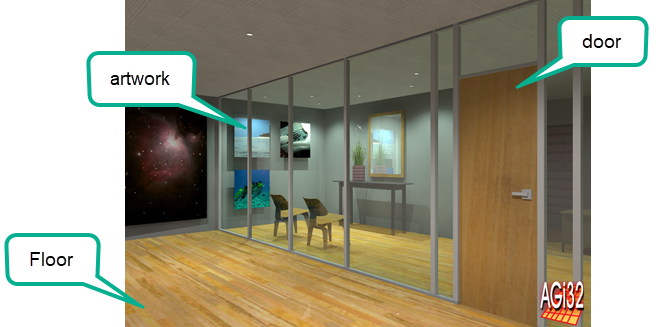
In general, there are two different types of textures used. Tiling textures produce seamless patterns when applied in a Grid or Static pattern to the surface. Most architectural surfaces (e.g., brick, carpet, stone, stucco) are created by applying tiled textures to the surface. Images that do not tile (such as artwork and photos) are also textures and are usually stretched across a surface.
A texture is a 2D image that is applied to a surface. Although the texture may look three dimensional, it is really flat and casts no shadows on itself or other surfaces. For example, a texture of brick looks 3D, with the bricks and mortar appearing to have different thicknesses, but the texture is just a "picture" of the brick. When the brick wall is illuminated in AGi32, the surface is flat.
Some typical texture applications:
Textures are considered in calculations when applied in AGi32. The average color and reflectance of the texture is calculated and used in the Radiosity calculations. Turning the textures on or off in Render Mode only effects the texture visibility, not the calculations. The underlying surface retains the average color and reflectance of the texture. The reflectance and average color of a texture can be changed to meet your needs. Change the reflectance at the time of application in the Room or Object dialogs, or change it after application using the Surface Edit command.
To preview how textures are applied to your surfaces without calculating, go to Render Mode, select the View - Display Properties command, enable the Shaded view and select the Textures option. This way you can ensure your images look correct before proceeding with the Radiosity calculations.
Applying textures to surfaces
Textures can be applied to Room and Object surfaces in one of two ways. When a Room or Object is initially created, textures can be applied to each of the related surfaces collectively (e.g. apply Texture to Ceiling, Walls and/or Floor). Alternatively, once the surface has been created, the individual surfaces may have textures applied to them individually or collectively with the Surface Edit command.
How textures are applied to surfaces
The selected texture is applied to the entire selected surface. For composite surfaces with multiple parts (such as domes), the texture is applied to each piece individually - not stretched across the entire dome. For cases like this, we recommend selecting a uniform texture with no discernable luminance or hue contrast so that the entire surface looks homogeneous. To add areas with different texture, create another object to contain the texture (e.g., an object on the wall with art stretched across it or molding with ornamental texture on it).
Note: Textures appear on both sides of a two sided surface. The texture is reversed on the back side of the surface.
Design Guidelines
- When applying textures to an environment, you will find that too many textures can make the renderings look unrealistic. Applying realistic textures to a few select surfaces creates rich, dynamic renderings.
- Size the textures realistically. Stretching a texture across a large surface can make the texture look blurry and out of focus. Static sizing places a fixed size on the texture - like a 1' floor tile. Each tile is 1' across and will be tiled accordingly, no matter how small or large the floor. When selecting a static size for a texture, look at the texture details and gauge a realistic size. For example, when looking at a brick texture - each brick is 8" long. If the texture contains 3 bricks across, you know the texture is approximately 2' long.
- Making textures: You may make textures yourself using a digital camera. When capturing images to use as tileable textures, care should be taken that the texture is uniform - no luminance contrast from one side to the other; the image should be cropped such that it does not create an undesirable pattern; and edges should be undetectable.
- Texture libraries are available for commercial sale; there are also many textures available for free online. Try searching for "free textures" or search through commercial manufacturers' websites (such as flooring or stone retailers).
Texture Notes
Texture images can be up to 1024 x 1024 pixels. Supported image formats: JPG, BMP and PNG.
When sharing object libraries that include textures, the texture files need to be shared as well. The texture files are not included in the Object Library; only references to the textures are included. The textures need to be copied into the same subfolders in Textures that they originated in, and the texture name must remain the same as well. The Textures database should be updated before the Library Object is selected for the textures to be applied. (Open the Textures dialog and check for the presence of the new texture.)