
![]()
Animation Points in Render Mode - Concepts
Animation Points allows you capture specific views that can be played back as either a slide show or animated. In addition, animations may be exported into industry standard movie file formats for playback on external players (such as Windows Media player or Apple's Quicktime player).
Terminology
- Scene – Continuous action in a single line of motion.
- Animation Point – Points of interest and/or direction changes with a scene.
- Slide Show – The process of playing back the scene by displaying one animation point at a time at a set display interval.
- Animation – The process of making the scene appear to move between animation points by the addition of slightly varying views between the animation points.
- Movie – The combination of one or scene animations exported into a standard format movie file suitable for playback on a variety of media players (e.g. Windows Media Player).
Adding Animation Points
When the View window contains a point of view (the view) you would like to save, you are ready to create the animation point. The easiest and fastest way to capture the current view is to use the Animation Point Quick Add command, which is associated with the F2 on the keyboard in Render mode. Simply press F2 to capture the current view, you can even do so while in an Interactive View command.
To capture a series of Animation Points for a slide Show or animation, capture animation points (views) for every small change in movement or view direction change as you are navigating in the environment.
|
In the diagram to the right, the blue arrows indicate the line of movement for the animation.
|
Tips for creating better animations:
|
 An Animation Point is captured at the beginning and end of each
line of movement.
An Animation Point is captured at the beginning and end of each
line of movement.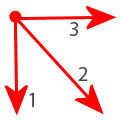 This three direction arrow indicates a view direction
change (in three parts):
This three direction arrow indicates a view direction
change (in three parts):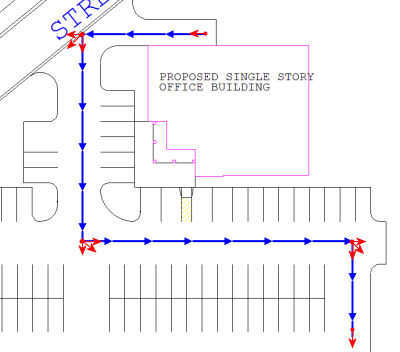
Managing Animation Points
The Animation dialog provides your control point for managing scenes, animation points, animation settings, slide show display interval and frame rate.
Current View Properties (Background Color, View Angles and Clipping Planes) are applied during playback. The View Properties present during animation point capture are not applied.
Scenes
It is not necessary to create a scene before adding animation points. A default scene, named Scene_1, is automatically created and animation points are automatically added to the default scene. You may rename scenes, delete scenes and create multiple scenes.
Note: When a scene is deleted, all the animation points within the scene are deleted as well.
Animation Points
Animation Points may be reordered, added, deleted, copied, change in status, and edited in the Animation dialog.
Animation
The Walk and Pause times indicate the transition period between specified animation points.
Slide Show Display Interval
The Slide Show Display Interval indicates how long (in seconds) a point is displayed when the animation points are played back sequentially.
Frame Rate
The Frame Rate indicates the number of frames per second (FPS) to use when generating an animation. Higher frame rates will result in smoother playback.
Scene Length
The time (in seconds) it takes to playback the entire scene; a sum of all Walk and Pause intervals.
Total Number of Frames
Indicates the total number of frames within the current scene.
Existing Animation Points (from older versions):
Animation Points created in older version of AGi32 are automatically added to the default scene (‘Scene_1’) and can be modified and played back without any additional modification.