
![]()
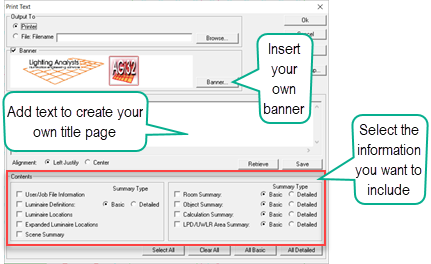
The Print Text command provides a convenient method of printing descriptive and/or statistical information in a preformatted manner. You may select specific Summaries to print or select all of them in one easy step. Clearly, if an entity type does not exist in the job file, the associated summary will not be generated. Some summary types, such as Luminaire Definitions, can be expanded to include more information if desired. This is achieved by clicking on the Detailed radio button.
This feature allows you to print archival information about your job file, so that you could recreate it in the future, and can provide you with additional presentation material so that your graphical output is cleaner.
In addition to producing printer output, you are provided the option of sending the selected output to a text file. When this option is selected, the output is formatted as simple ASCII text; all special formatting is removed and the banner, if selected, is not included. The folder containing the file is automatically opened after the file is created, for easy viewing or for other file functions (e.g., attaching the text file to an e-mail message).
Banner
The banner is composed of a graphic file of your own creation. The image file must be in BMP, JPG, PNG or WMF format and can be created in any graphics program capable of saving in these formats. File size is up to a maximum of 1.25 x 6 Inches. In pixels, this corresponds to 90 x 432 (in 72 dpi). Files larger in size will be compressed to fit.
When selected, the Banner will print at the top of every page. We recommend that banners be composed of a corporate logo and possible company information. Keep in mind that a Banner is a graphic (raster) file, and very small text will be difficult to discern when printed.
Title Page
The Title Page section provides a test entry area for you to compose descriptive text you may want to include in a separate Title Page. The Title Page also prints with the Banner across the top. Some users prefer to add their descriptive information to the Banner and save the Title page for job descriptions. Others simplify the banner and include all company and job descriptions in the Title Page.
You can save your text entry for repeated use by selecting the Save button. Only one Title Page can be saved at a time. The saved Title Page can be merged into a new job file by using the Retrieve button.
Alignment
Text included in the Title Page can be aligned with the left margin or centered within the page.
Save and Retrieve buttons
Any portion of the text entered in the Title Page section can be saved to use repeatedly with each new job file. Once the text is retrieved, you can modify any portion of the text, add to or delete from it, even save it again. All text entered in the Title Page section will print, whether it is saved or not.
Contents
The Contents section contains selection boxes for the variety of information that can be summarized in the job file. Certain topics allow you to select Basic and Detailed Summaries. The table below describes each summary briefly.
|
Topic |
Basic Summary |
Detailed Summary |
|---|---|---|
|
User / Job File Information |
User Info (User name, Company Name, Address, Telephone, etc) from User Information dialog. Job file information (file size, AGi32 version, user information, date last modified, total time (in hours) file has been opened since it was first saved, description and user information notes) from File Information dialog. |
|
|
Luminaire Definitions |
Summary of luminaire definitions including Attributes, Photometry section (of Define), Luminous Box, Calculated metrics, Symbol detail, Arrangement details. |
Basic plus LCS zonal summary data. |
|
Luminaire Locations |
Luminaire Location information: Luminaire Number, Label, Insertion point X, Y Z, Orient, Tilt, Roll, Spin, Aiming Point and Switched Status (On/Off). Summary By Label (includes Quantity). |
|
|
Expanded Luminaire Locations |
Expanded Luminaire Location information (arrangements and groups are broken into individual locations): Luminaire Number, Label, Tag, Insertion Point X, Y Z, Photometric Center X,Y,Z, Orient, Tilt, Roll, Spin, Aiming Points, and Switched Status (On/Off). Summary By Label (includes Quantity). Summary By Tag (includes Quantity). Note: Summary By Tag is sorted by Tag. Sorting is most effective with non-numeric Tags. Note: Page orientation for Expanded Luminaire Locations is Landscape to accommodate all of the data. |
|
| Scene Summary | Summary of the active Scene, including information on Channel status, and luminaires included. | |
|
Room Summary |
Brief summary of rooms. |
Basic Summary plus: Surface Information (Label, Type Color, reflectance, transmittance of every surface, X, Y Z of first point of surface). |
|
Object Summary |
Brief summary of objects. |
Basic Summary plus: Surface Information (Label, Type Color, reflectance, transmittance of every surface, X, Y Z of first point of surface). |
|
Calculation Summary |
Brief summary of calculation points and numeric summary for each. |
Basic Summary plus: Vertices (for certain types) and summary of all calculation points (Point Number, X, Y, Z, meter Orient and Tilt and Value). This summary may require several pages of output. |
|
LPD / UWLR Area Summary |
Brief summary of LPD/UWLR Areas. |
Basic Summary plus Vertices. |
Select All, Clear All, All Basic, All Detailed Buttons
The Select All, Clear All, All Basic, and All Detailed buttons act on the summary items globally to make multiple selections easier. To print all relevant summaries, click the Select All button. Likewise, clear all selections by selecting the Clear All button. To print basic summaries, use the All Basic button, or to print all detailed summaries, use the All Detailed button.
Creating Movie Files - Viewpoints and Animations