![]()
Arraying Objects - Concepts
Individual or Library objects can be duplicated in a uniformly spaced fashion in a copying method called Array. AGi32 provides two types of Arrays: Rectangular and Polar. Rectangular arrays create rectilinear, three dimensional duplication sets that are specified with X, Y and Z quantities and spacings. Polar arrays create three dimensional circular or semi-circular duplication sets that are specified with angle, quantity and rotation criteria. Both array types can provide enormous time savers when it is necessary to create repetitive elements such as cubicles, parking barriers, partitions, furniture and more.
Rectangular Arrays are created by specifying three criteria types; Number of Objects, Spacing of Objects and Array Angle.
Number of Objects in X, Y or Z Direction - Indicates the total number of objects in the stated direction, including the original, after the array is created. There will always be at least one object in each direction.
Spacing in X, Y or Z Direction - Indicates the distance between objects, from start of one object to start of another, in the stated direction. Units are specified using the current Display Unit, Feet or Meters. A spacing of zero is equivalent to no objects arrayed in stated direction.
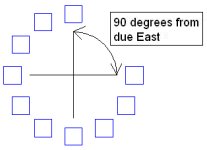
Array Angle (X Direction) - Indicates counterclockwise rotation of array from due East or zero degrees horizontal in world coordinates. The orientation of the objects in the array will be identical to the original. Spacing between objects in an angled array will be measured along the direction of the array, not parallel to the Cartesian axis.
Polar Arrays
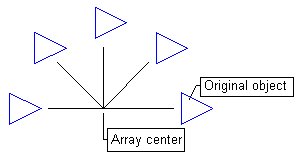
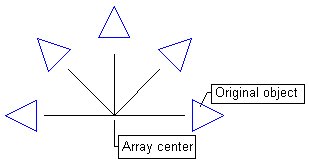
Objects can be duplicated along a circular or semi-circular path using the Object Polar Array command. The specification criteria includes Starting and Ending angles of the Array, center point, number of locations to be produced and object orientation. The object orientation can either be the same as the original or directed outward from the array center. The inward orientation is disabled for object polar arrays, because it produces identical results as an outward orientation.
Selection Point - When the Object-Polar Array command is initiated, the cursor changes to a pickbox so that an individual object may be selected. The selection point should be chosen carefully, because this location becomes a reference point by which the objects will be arrayed. Selecting the corner of an object will produce different results than selecting the midpoint of a side. Consider this example:
|
|
|
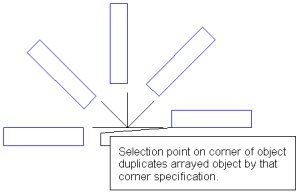

In the example on the left, the selection point was the lower left corner of the original object. The array operation duplicates the original object around a circular path with this corner used as the reference point. The example on the right uses the same exact parameters with the exception of the reference point. The selection point chosen is in the middle of the left short side instead of the corner. The resultant array is now symmetrical.
As the above example illustrates, the initial starting point location is critical to the placement of arrayed objects.
Array Center Point - Once the object is selected, you are prompted for the location of the polar array center. The distance specified is the radius of the array and dictates the distance that each duplicate object will be located from the array center. The angle between the selection point and the array center is the Starting Angle. This starting Angle may not be altered, so choose your center point deliberately. Tip: Polar Arrays are always created in a counter clockwise direction.
Careful selection of the array center point will allow you to create symmetrical arrays or relatively abstract ones.
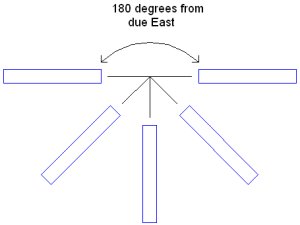
Starting Angle - The Starting Angle of the array is determined by the angle formed between a line formed from selection point to array center and a line formed between array center to due East. This angle cannot be entered manually by the user, it is determined by the location of the selection point and the array center point.
|
|
|
Ending Angle - The Ending Angle of the array dictates the location of the last object to be placed in the array. If the Ending Angle is equal to the Starting Angle the array will form a complete circle. In this case, there is an object placed at the Starting Angle but not the Ending Angle, otherwise two objects would occupy the same position. If the Ending Angle does not equal the Starting Angle, an object is placed at both the Starting and Ending Angles.
Number of Locations - This value indicates the total number of objects in the polar array, including the original object. The total number of objects in the array must be two or more.
Angle Increment - This value describes the angle between each pair of objects in the polar array.
- If Starting Angle Does Not Equal Ending Angle - Angle Increment is calculated this way: (Ending Angle - Starting Angle) / (Number of Locations - 1)
- If Starting Angle Equals Ending Angle - Angle Increment is calculated this way: (Ending Angle - Starting Angle) / (Number of Locations)
Entity Orientation - Two selections are provided for object orientation.
- Same as Selected Entity - Indicates that all objects created in the array will be oriented the same as the original.
- Same as Polar Angle (Orient way from center of array) - Indicates that all objects created in the array will be oriented away from the array center and in alignment with the displacement vector.
- The Opposite of Polar Array and Perpendicular to Polar Array options are disabled for objects.
|
Orientation - Same as Selected Entity |
Orientation - Same as Polar Angle (Orient way from center of array) |