
![]()
Add Daylight Study Dates and Times
In the Add Daylight Study Date and Time dialog, you may either select a Single Date and Time, or you may specify a Date and Time Interval by clicking in the appropriate radio button adjacent to the selection.
A single date and time can be selected for the study, if desired. Typically, if only a single date and time is selected, it will be combined with additional single Date/Time samples that do not fall into a regular interval. If this is not the case, a single daylight calculation can be computed by simply using the Daylighting command and not the Daylight Study.
|
Selecting a date The default date setting in the pull-down menu will be the current system date on your computer. Click on the drop-down arrow to reveal a monthly calendar that you can use to select a date. Scroll between months using the arrows at the top of the calendar; click on a date to select it. |
|
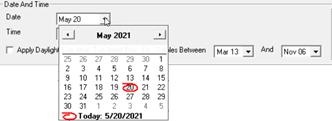
Selecting a time - Times are specified in hours and minutes. The time can be changed by clicking on any of the units of time and manually typing from the keyboard, or by using the scroll buttons beside the time setting. A 24-hour ("military") clock is used (no AM or PM).
If Daylight Saving Time has been specified in the Daylight Parameters dialog, those conditions will be applied in the Daylight Study to all dates that fall in the DST interval.
The most common use of the daylight study will be to compute the contribution of daylight over a specific time period in order to establish the extreme effects of daylight on an exterior site or interior space. Generic dates of interest may be the Equinox and Solstice dates.
Start Date - Select the date on which to begin the interval. Select the date from the drop-down calendar as explained above.
End Date - Select the last date for the interval from the drop-down calendar as explained above.
Increment - Enter the number of days between samples. This number may range from 1 to 365. For example, every day, every 7 days, etc.
Start Time - Select the time of day on which to begin the interval. You should be careful to select a time when the sun is above the horizon. A 24-hour ("military") clock is used (no AM or PM).
End Time - Select the time of day on which to end the interval. Again, it is important to select a time when the sun is above the horizon.
Time Interval - Set the interval between samples in decimal hours. For example, if you want a sample every two hours, enter 2.
Number of Date/Time Samples Specified - The total number of studies in the specified interval is computed at the bottom of the dialog. You can add multiple intervals as required; therefore,this total applies to this interval only. An absolute total number of samples is shown at the bottom of the main Daylight Study dialog.
If Daylight Saving Time has been specified in the Daylight Parameters dialog, those conditions will be applied in the Daylight Study to all dates that fall in the DST interval.
NOTE: All date/time samples are rounded back to the previous hour, per IES document LM-83-12. For example, if the time entered is 09:15, the time used for the calculation will be 09:00. If the time is 15:49, the time used for the calculation will be 15:00