![]()
A texture is any JPG, BMP or PNG image that you can apply to Object or Room surfaces to add a more photorealistic effect to your renderings. Textures are used to represent patterns across the surface instead of a solid color and are most often used to represent materials (i.e., brick, carpet, grass, tile, etc.).
Unlike the real surface, textures only overlay images on top of a flat surface. For example, a texture of brick appears to have mortared joints and rough bricks, but in reality the image is two dimensional. This means that you cannot graze the brick texture with light and expect to see shadowing from the bricks.
Textures are considered in the Radiosity calculations as their weighted average pixel reflectance is applied to the surface they are mapped to, replacing the original surface reflectance. Texture reflectances can be adjusted to meet your requirements at the time of application (in the Object or Room dialog) or by using AGi32's Surface Edit command post application.
Selecting textures
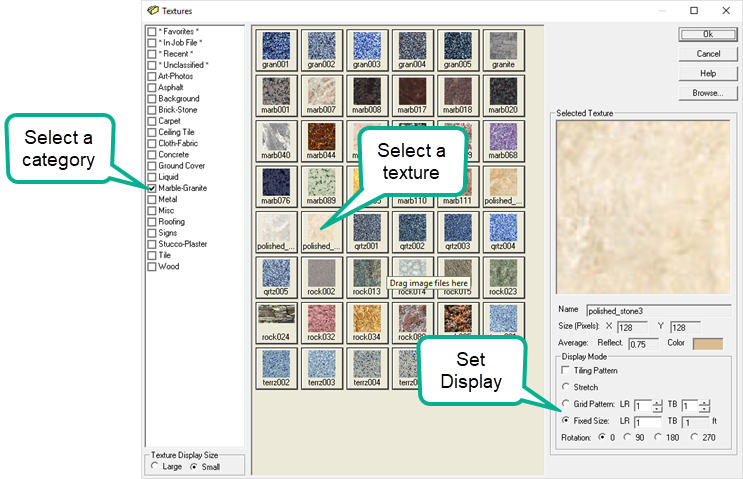
The Select Textures dialog is displayed when you wish to apply textures to a surface in AGi32. Use the following steps to select a texture:
- Select a Category to see the textures assigned that classification. Textures are displayed as tiles with the texture name below the image.
- Click on any texture tile to select it. It will appear in the larger window on the right side of the dialog along with its calculated reflectance and average color. The reflectance can be changed in the Object or Room dialog, or after application using the Surface Edit command.
- Select the method to be used to display the texture on the surface (Display mode). See topic "Texture Application"
- Click OK to proceed.
Browse - The Browse button allows you to search your computer or network for an image file to use as a texture. Acceptable image file types include BMP, JPG, and PNG. When an image is selected in this manner, you are prompted to add it to the Textures database.
Right click on any texture tile to make it a Favorite that can be seen under the Favorites Category in the future.