
Color / Spectral Radiant Emittance (SRE) Selector
The Luminous Area Color is analogous to the source color of the emitted light. In AGi32 this is called Spectral Radiant Emittance (SRE).
This dialog can be used to model emitted light in terms of:
- Source color (Source Color tab)
- Color Filters (Color Filters tab)
- Manual mixing of RGB components to create a custom SRE (Color Mixer tab).
By default, luminaires emit a white light, an SRE value of 1.00, or 100%. When color is applied, it will change the rendered color of the light emitted. When selecting from the Source Color tab, the color does not affect the luminaire output. However, when selecting from the Color Filter tab or the SRE tab, the SRE application decreases the luminaire output as indicated by the SRE figure.
For example, if a filter or custom SRE color is selected that corresponds to an SRE figure of 0.89, the output of the luminaire is then 89% of what it was without the color applied. This is acceptable when using color to model the effect of a colored gel over the light source, as the gel has a transmittance value associated with it. It can be normalized by applying the reciprocal of the SRE value in the LLF using the "other" cell if desired.
When attempting to use luminous color to approximate lamp color, the Correlated Color Temperature (CCT) of the source should be selected from the Source Color tab instead. It is important to be aware that the color selected is an approximation of the spectral characteristics of the lamp.
Computer graphics rendering technology cannot easily simulate light source Spectral Power Distribution data (SPD). However, it is possible to convert SPD data to an RGB equivalent. While this is not a perfect conversion, it is usually adequate for convincing visualizations.
On the Source Color tab, you may select a source color by CCT value or common lamp description. You may sort the colors by Description, CCT, etc. by simply clicking on the heading of any of the columns.
When a color is selected, its display color is shown in the Selected (or new) Source Color field. It is important to note that the color displayed is relative to a 6500K white point. (All computer monitors have a 6500K white point.) Any CCTs below 6500K will appear as warmer than white. In this example, a "Standard Fluorescent" lamp with CCT = 4150K is selected and the Source Color displayed is warmer than the original white (6500K) color. See Rendering Source Color below.
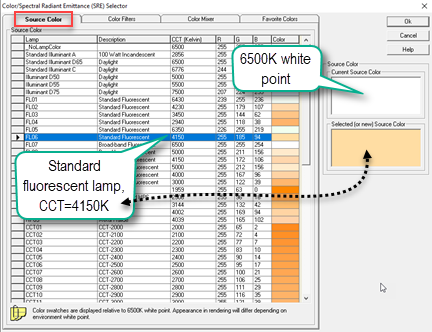
Table of SRE and RGB values for dominant LED wavelengths
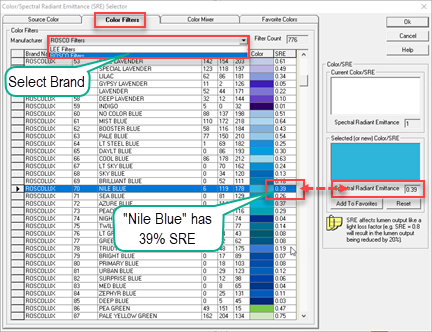
Color Filters
On the Color Filters tab, you may select a Lee or Rosco brand color filters by name or number. The two different brands are selected from the Manufacturer menu at the top of the dialog. You can sort the color filters in various ways by clicking on the column headers. In the example below, the luminaire output is now down to 39%.
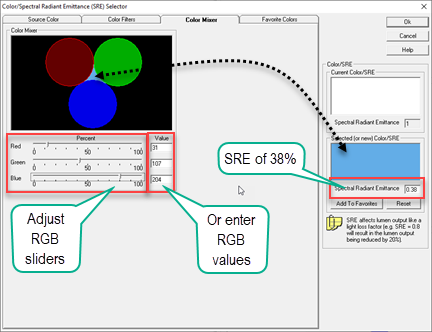
Color Mixer
On the Color Mixer tab you will move the slider controls for Red, Green and Blue until the desired color appears both in the center of the Color Mixer and the selected SRE cell on the right side of the dialog. Alternatively, you can enter RGB values manually (between 0 and 255).
The calculated SRE value is shown below the selected color. This is the amount the luminaire output has been derated. In the example above, the luminaire output is now 83%. Your can apply the reciprocal of this number in the Light Loss Factor area of the luminaire definition to reverse out the deration if desired.
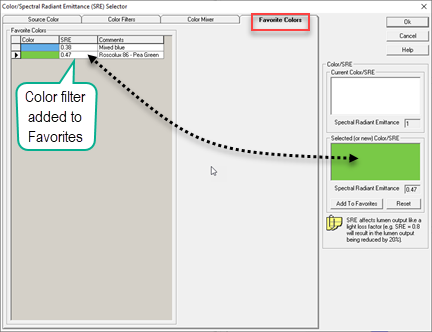
Favorite Colors
It is convenient to be able to store favorite color combinations for later use. By selecting the Add to Favorites button in the Color Filter or Color Mixer tabs the color will be stored in the Favorites tab with Color, SRE, and Comments to aid in later identification.
You can recall a favorite color selection anytime by selecting the Favorites tab and clicking on the color cell. Click OK to exit the dialog and return the color to the luminaire define process.
Rendering Source Color
When rendering colored light sources, AGi32 will automatically set the default white point of the display to the highest CCT of the luminaires placed in the model. This will be deceptive if all of the sources are the same CCT.
Consider an example: assume two light sources, one of 3000K CCT and another of 5000K CCT. If only the 3000K luminaires are in the model, the white point is set to 3000K making the rendered image appear white. If you swap all of the 3000K luminaires for 5000K luminaires and render again, the rendering will be identical as now the white point is set at 5000K. Essentially this is adjusting for Chromatic Adaptation (see below). Returning to our example, if we place luminaires of both CCT's in the model, the rendered image will set the white point to the highest CCT luminaires (5000K). The rendering now allows the lower CCT luminaires to look warmer and more realistic. You can see this in the Render Display Properties. If you would like to alter the image by setting your own white point CCT, you can do that as well. This would allow you to render all 3000K luminaires with a 6500K white point (or something lower). Doing the same for the 5000K luminaire rendering you can compare the visualizations on a standardized white point CCT.
In Render Mode, AGi32 will adjust the display to allow for the chromatic adaptation that happens in real life. This automatic adjustment will give an image that is closer in appearance to what we actually perceive, provided the source CRI is 70 or higher. You will have the opportunity to further adjust the image as you see fit. See Display Properties and Display Properties - Concepts for more information on making adjustments to the Render Mode Image.